Email Subscription is an important feature to have on your site as it provides your users with an easier way to consume your content as some of them might not be on social media. Also, it can help you gain regular visitors for your site. So, stressing the importance of email subscription, we added the Newsletter widget in our Essential Widgets Pro plugin. With the newsletter widget option, you can set up newsletter effortlessly.
Essential Widgets Pro is a premium WordPress plugin that allows you to create and add many interesting and highly customizable widgets (18 to be precise) on your website to make it more attractive and dynamic. Among those is the Newsletter widget, one of the most reliable and direct ways to communicate with your visitors. It allows you to set up a WordPress Newsletter within minutes. Today, we will be guiding you to set up newsletter easily and make the most out of it.
Set up Newsletter Easily with Essential Widgets Pro
First of all, you need to install and activate the Essential Widget Pro plugin. You can buy the Essential Widget Pro plugin here.
After activating the plugin, visit Appearance > Widgets from your WordPress dashboard. This will take you to the main Widgets page; drag and drop the EW: Newsletter widget to where you want it to be displayed.
Add your Title, Background Image URL, select your background attachment (fixed or scroll) and add the text to show before and after the form.
And finally, on the Service option, we have provided four different ways to set up newsletter widget for you—Google/Feedburner, MailChimp, MailPoet, and Custom.
Google/Feedburner
On the Feedburner option, you will be asked to enter your Google/Feedburner ID. In order to get your ID, you need to visit your feed from within the Feedburner interface. Click the feed icon and open the Feed Content page in your web browser.
At the top of your browser, you will see your Feedburner ID.
Copy and paste your ID in order to add newsletter feature to your website.
MailChimp
MailChimp is an option where you need to sign up for a free MailChimp account. Sign up here and activate your MailChimp account. Once you activate your account, you will have to answer a series of questions to complete your account creation. Now, you need to create a list for your new newsletter. For your newsletter list, navigate to the List tab and hit the Create List button; submit your information on the next screen.
Now that you’ve created the list from your new account, click on the List tab > the name of your list. Then, click the ‘Signup Forms’ tab and select the embedded forms option. After that, choose the ‘Unstyled’ form option.
You will now be provided with the code at the bottom right of the screen that you need for the newsletter.
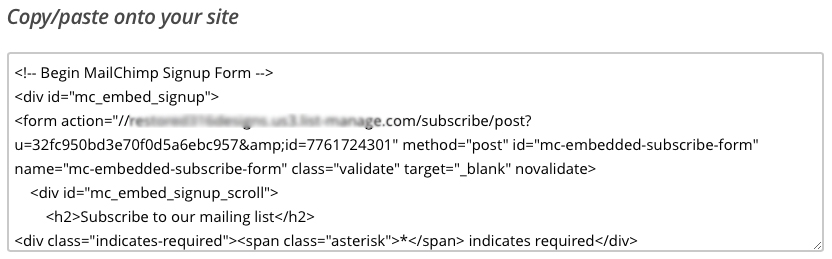
Find the code that looks like this:
<formaction=”//stock.us3.list-manage.com/subscribe/post?u=32fc950bd3e70f0d5a6ebc957&id=7761724301”
Copy only the bold ones with your unique id number and head towards the Newsletter widget from your dashboard. In the Form Action field, paste the code you copied earlier. Note that this is the most crucial step in this process.
You can then, fill up the remaining fields—first name, last name, and email—manually.
MailPoet
In this Newsletter service type, all you need to do is download and activate a free WordPress plugin called MailPoet. There are different versions of this plugin; you can choose whichever you want and enjoy your newsletter service. After activating the plugin, follow the instruction from the MailPoet plugin.
Custom
In the Custom service type, you will have to enter the Form Action field along with a few other fields manually in order to set up a newsletter. On the Form Action field, you can add links to where you want your visitors to fill up the form for the Newsletter service.
Finally, these were the ways or services that you can choose to display the email subscription feature in WordPress with our Essential Widgets Pro plugin.
Now that you know how, set up newsletter easily, and don’t miss the chance to turn your one-time visitors into regular readers!
Which one did you find the easiest? Share your thoughts in the comments.